Airfield Viewing Guide - RAF Wittering
General Description
Located North of Wittering village and on the West side of the A1, North of the A47, around 4 miles South of Stamford and 8 miles West of Peterborough. RAF Wittering is actually two airfields that have merged together; unfortunately this and the A1 have made access for viewing rather difficult to say the least. Wittering was home to the Harriers of various squadrons over the years, but not any more - now it's just the far less exciting activity of various Tutor squadrons.
| ICAO | Telephone | Web links |
|---|---|---|
| EGXT | 01780 783838 | RAF Wittering |
| Aerial view |
| Frequencies | |
|---|---|
| Frequency | Description |
| 125.525 | Tower |
| 130.200 | Zone (Cottesmore) |
| 234.075 | Approach |
| 241.725 | Operations |
| 242.475 | ATIS |
| 244.550 | PAR |
| 275.325 | PAR |
| 281.900 | Director |
| 298.200 | Operations |
| 369.225 | Ground |
| 372.225 | Tower |
| 376.650 | PAR |
What you can expect to see
Tutors of the resident units - No. 3 FTS, 16(R) and 115(R) Squadrons, Cambridge UAS, London UAS and 5 AEF. You may be lucky and see other RAF types carrying out practice approaches and the occasional fuel stop.
Viewing
Driving up the A1 Northbound, you will see a turn-off for Wittering village, take this. If you follow the road it will curve round to the right and then things become somewhat woody, dark and narrow. SLOW RIGHT DOWN! There is a blind bend to the left here which is barely wide enough for two cars, and there are plenty of nutters who barrel through here at 50-60 mph. Out of the blind bend the road is still dangerous as it is so narrow and so many idiots are incapable of keeping on their side of the road, so be very careful. The road curves right again going up towards the edge of the station - you can see the hangars now (A). Views onto the pan are pretty limited here (but if you want serials, a walk along this road may suit your purposes), so keep following this horrible little road along the fence. There's a crash gate just before it curves left, but again viewing is pretty non-existent.

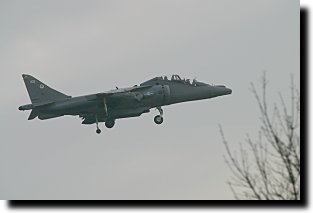
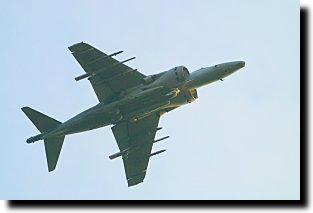
Harrier T.10 landing (taken from point B, 800mm lens); author |
Keep going and the road now goes away from the airfield. Shortly you'll see a lane off to the right with a sign for a pig farm and 'PRIVATE ROAD' displayed prominently. If you park the car at the side of the road near here (B) and stand at the corner of the lane and look across the field (direction - about 45 degrees right of the lane) you may be able to see any flying activity in the distance. The land owners here prefer spotters do not drive down the lane, but tolerate occasional people on foot going town towards the control tower (C). Some views of the taxiways and hangars are available from the far end, though the control tower and firestation block the direct view opposite you and the RAF Police will take an interest in anybody hanging around down here as well. |
| Back to the car and continue driving away from Wittering. Turn right onto the A47 (towards Leicester). Take the next right (towards Collyweston). Immediately on your right here is an area of rough ground you can park on (D). Here you are as near as you can get to the end of runway 08 and Tutors on finals will pass nearly overhead. It's not great for photography as they are still rather high though. You can also park by the side of this road further North towards Collyweston to change your angle on the approach, just be careful getting out of your car as the road can get busy at certain times of day. |
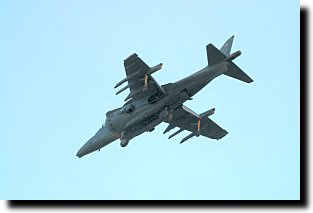
Harrier GR.7 on finals (taken from North of point D); author |
Continue driving towards Collyweston and turn right onto the A43 towards Easton on the Hill. On the right at a cross junction there is small road that runs towards a crash gate (E), however this is nearest the Western end of the runway and is lower than the rest of the airfield - aircraft landing on 26 will be well out of sight; even if they taxied all the way to the end of the runway you wouldn't see them. Aircraft flying circuits will however lift off to your left and you should be able to read off tail codes or possibly serials with a good pair of binoculars - and maybe even get useable photographs with a large lens, say 600mm or above. It's not a good spot though, unless you particularly want a photo of the combined aircraft-building metal construction the firecrews use for practicing on! There is a footpath across the fields here to the East but it leads to near enough this same spot and is therefore not worth the long hike from the road.
Giving up on this spot and going back down the road to the village, turn right onto the A43 again and you will soon see a turn-off to the right signposted to Barnack. Take this and keep going for quite a while until you see an aerial mast. Pull in on the right by this mast (F) and you'll see a red bar across a lane that disappears towards the airfield. This looks promising at first sight... so, ten minute's walk down this lane (which isn't marked as being private property though it may be - so exercise discretion) and youll find the lane dips as it ends so by the time you reach the crash gate here (G), all you can see is a hill in front of you with some caravans parked on it. Assuming you don't want the serials of these, about the only use this spot now has is if you are lucky and the Tutors are practicing tight circuits; they may fly over your head here. However, that's a rarity!
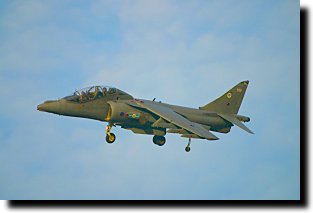
Harrier T.10 on short finals (taken from point H, 500mm lens); author |
So, return to your car and turn right to continue on the Barnack road - just round the corner from the aerial mast you will join the A1 just before an exit/roundabout, time to double back onto the A1 southbound. Keep going South - you'll see a turn for Barnack but for the time being we will ignore this. Just down the road from the turn is a small layby - if you want to risk it, park here. From here you have a clear but distant view of aircraft on finals to 26. Photography requires a 500mm lens to fill the frame of anything going over the A1. You could always leave the car here and walk along the side of the A1 until you're in line with the approach lights. However, this is not a pleasant experience. The walk itself is noisy, smelly and dangerous, with HGVs thundering past you every few seconds on most days. The police have been known to ask people to move on if they find they have left their cars in the layby too. Photography-wise it's not that brilliant and certainly not worth the risk to your life and health - particularly for Tutors! |
| So... continue on Southbound! You will notice a couple of turn-offs into farm tracks but you can't stop at either of these - you'd be blocking their access and it's dangerous enough slowing down to get into either of them. You'll soon see another turn-off for Barnack - take this one and drive up this road. Shortly after the road comes out of the trees you'll see a gate marked 'PRIVATE' on the left followed very shortly by another entrance on the right. Just up from here (I) is possibly the best spot there is for viewing. Aircraft may curve round on finals to 26 around about here, offering nice topside views, or underside views (depending on how tight they turn). The bad news is, you need a big lens - there's significant variation on the track they take towards final approach and this can mean needing anything from 200mm to 800mm for a full frame shot. The sun in the early morning is a pain here but later in the day things improve. |
Harrier T.10 curving onto finals (taken from point I, 800mm lens); author |
Harrier GR.7 curving onto finals (taken from point J); author |
Next, continue up the road. Ignore the Barnack village turn and you'll come to a T junction. Turn left (back towards the A1) and right at the end, just before you come to the A1, there are several places where you can pull the car over onto the verge (J). From here you have a clear but distant view of aircraft landing on 26 or departing from 08. Unfortunately the position of the sun for much of the day and the trees here make photography rather hit and miss. |
| Back onto the A1 Southbound and you'll soon see a turn-off to the right into Wittering village. You may have to wait some time here to cross the Northbound carriageway but once you have done so, turn around and rejoin the A1 going North. Almost immediately there is a turn-off for the station itself. There is a pretty big car park here, but you are now on MoD property (K). The Harrier gate guard can normally be photographed if you ask nicely - there will be a human gate guard in camofulage fatigues at the small gatehouse, who will generally say no to your request but should refer you to the RAF Police in the main guardroom for a definite answer. The RAF Police are normally okay about photographing the Harrier, especially if you pre-empt their objections by saying you'll only photograph facing away from the gate, out towards the A1. |
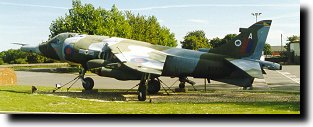
Harrier GR.3 gate guard (taken from point K); author |
Back out onto the A1 Northbound. Shortly after your pass the approach lights and the station disappears behind the rising ground, there is a large layby on your left. Pull in here (L). If you really do want to hang around close to the approach this is your safest option - you can walk back down towards the lights on the cycle path on this side - again it's not a pleasant experience though and the high hedges will make for very little warning of anything on finals. So that's it for Wittering, possibly one of the least rewarding stations for spotting in the UK.
Other Information
Petrol is available in Wittering village.
Foreign visitors may wish to note that the A1 is sometimes signposted as the Great Northern Road.
The area South of the station is somewhat pastoral and quiet so you're unlikely to be troubled by the plod if you do park on a verge somewhere; North of the station the roads are busier but you've got no reason to hang around on them anyway!
Contributors: author, Gary Parsons, Graeme Carrott, Howard Curtis, David Tanner, Jason Pountney, Geoff Hooper, Milscanners.